
Overview
Element 451 sends a high volume of automated recruitment and CRM-related email — inquiry confirmations, campaign notifications, workflow alerts, and system digests. Left unmanaged, these messages quickly bury day-to-day correspondence in a busy inbox.
This guide walks staff through two steps that solve the problem permanently:
- Create a dedicated mailbox folder named “Element 451” to hold these messages.
- Create an inbox rule that automatically detects Element 451 mail and moves it (and, optionally, forwards a copy) to that folder — so it never has to be sorted by hand again.
Instructions are provided for both the Outlook desktop application (Windows) and Outlook on the web. Use whichever you work in day to day; the end result is the same. If you use both, you only need to set the rule up once — desktop and web rules run against the same mailbox and will sync automatically.
Part 1: Outlook Desktop App (Windows)
Step 1: Create the “Element 451” folder
Right-click your Inbox (or the top level of your mailbox) in the folder pane, then select New Folder. Name the folder Element 451 and confirm it is nested under your Inbox, then click OK.
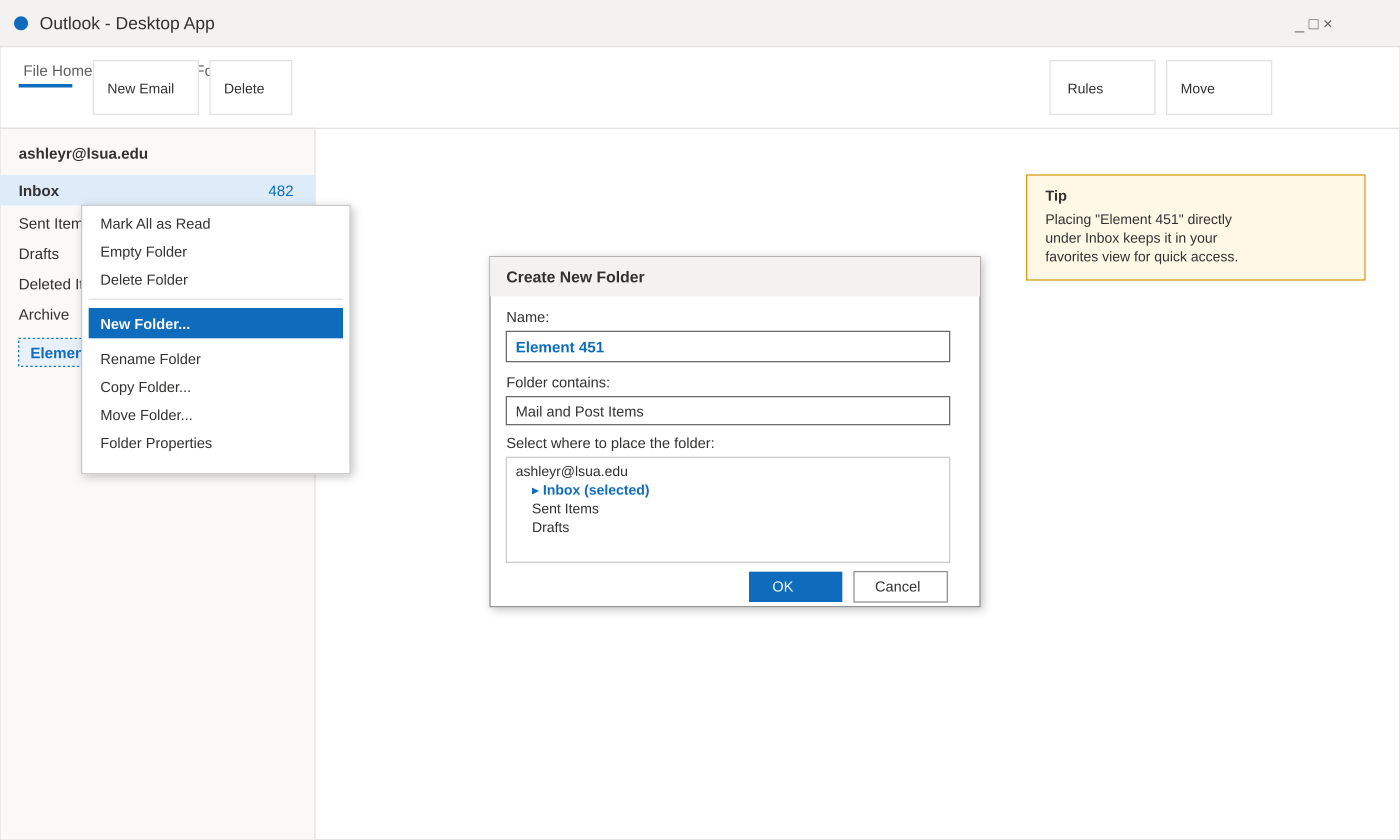
Figure 1. Right-click the Inbox → New Folder…, then name it “Element 451.”
Step 2: Open the Rules Wizard
On the Home tab of the ribbon, click Rules, then choose Manage Rules & Alerts. In the dialog that opens, click New Rule… to launch the Rules Wizard.
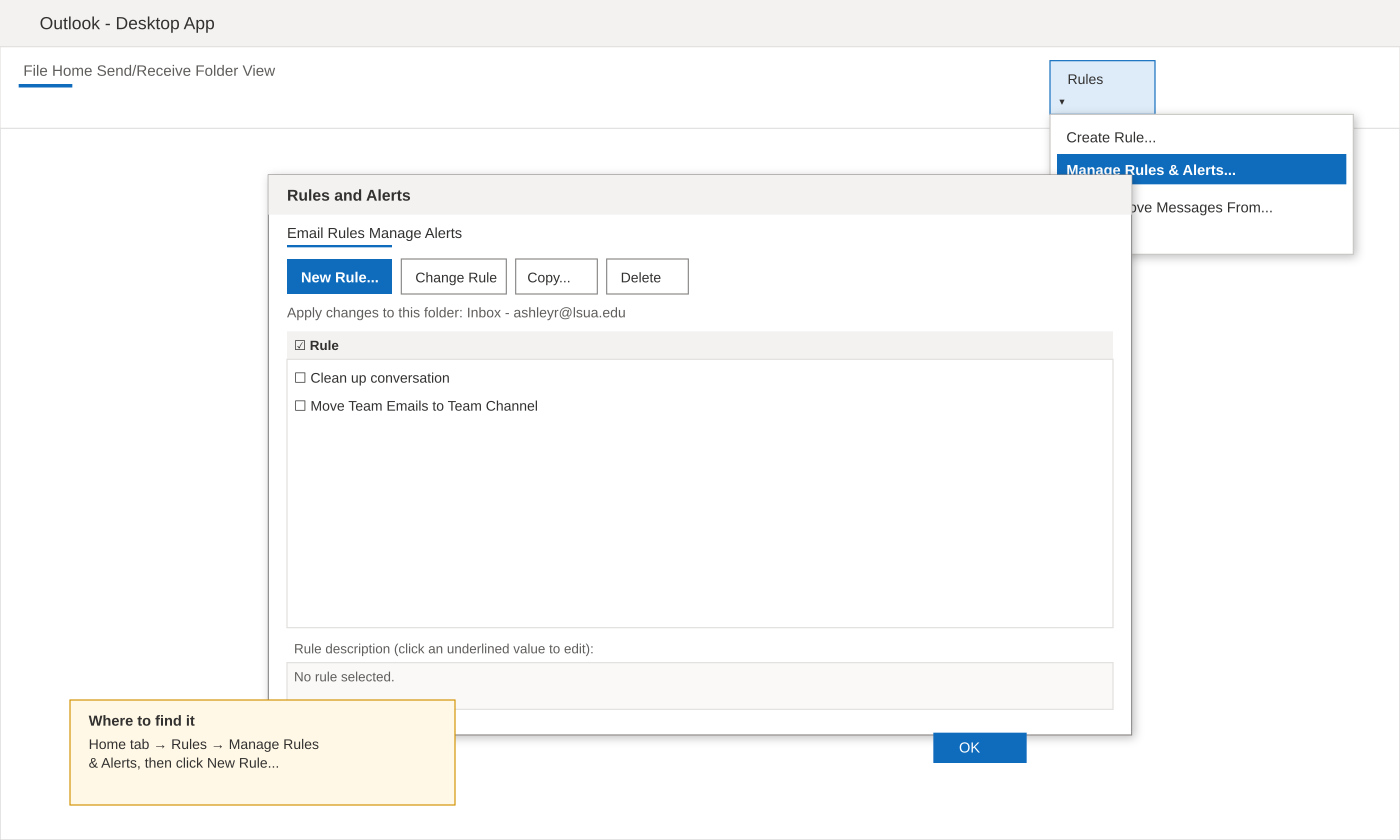
Figure 2. Home tab → Rules → Manage Rules & Alerts → New Rule…
When prompted for a template, choose “Apply rule on messages I receive” (under Start from a blank rule), then click Next.
Step 3: Set the condition and action
Check “with specific words in the sender's address,” then click the underlined “specific words” link and enter element451.com (or the exact domain/address your Element 451 mail comes from). Click Next.
On the actions screen, check “move it to the specified folder,” click the underlined “specified” link, and select the Element 451 folder you created in Step 1. Optionally, also check “forward it to people or public group” if you want a copy routed to a shared mailbox. Checking “stop processing more rules” is recommended so Element 451 mail is not also caught by other rules.
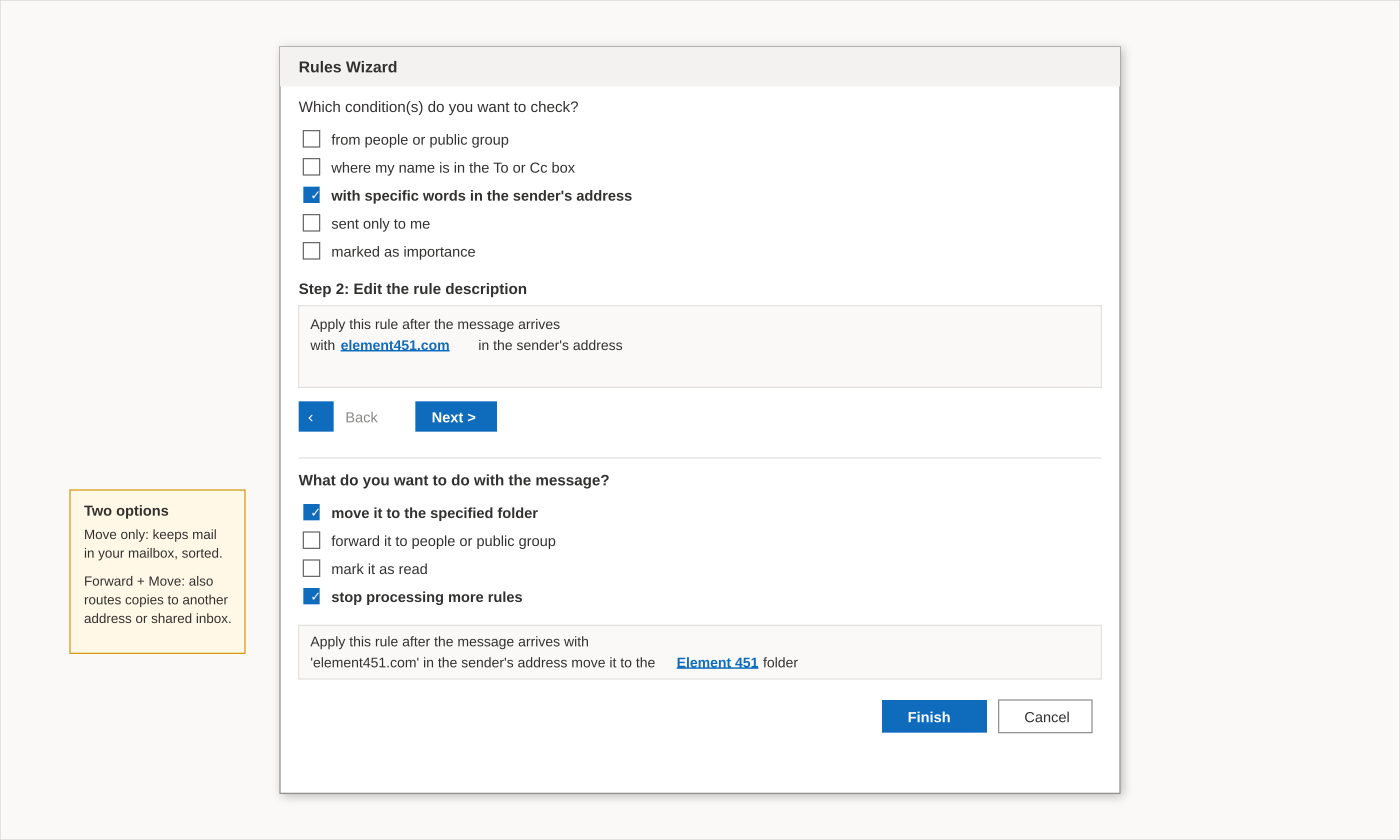
Figure 3. Set the sender condition, then choose “move it to the specified folder.”
Click Next through any remaining exception screens (none are required), give the rule a clear name such as “Sort Element 451 Mail,” confirm “Turn on this rule” is checked, and click Finish, then OK.
Result New Element 451 mail will now move automatically into your Element 451 folder (and forward a copy, if configured) the moment it arrives — no manual sorting required. |
Part 2: Outlook on the Web (OWA)
Use these steps when working from a browser at outlook.office.com. The result is identical to the desktop version above.
Step 1: Create the “Element 451” folder
In the left folder pane, right-click Inbox and select Create new folder. Type Element 451 as the name and press Enter to save it.
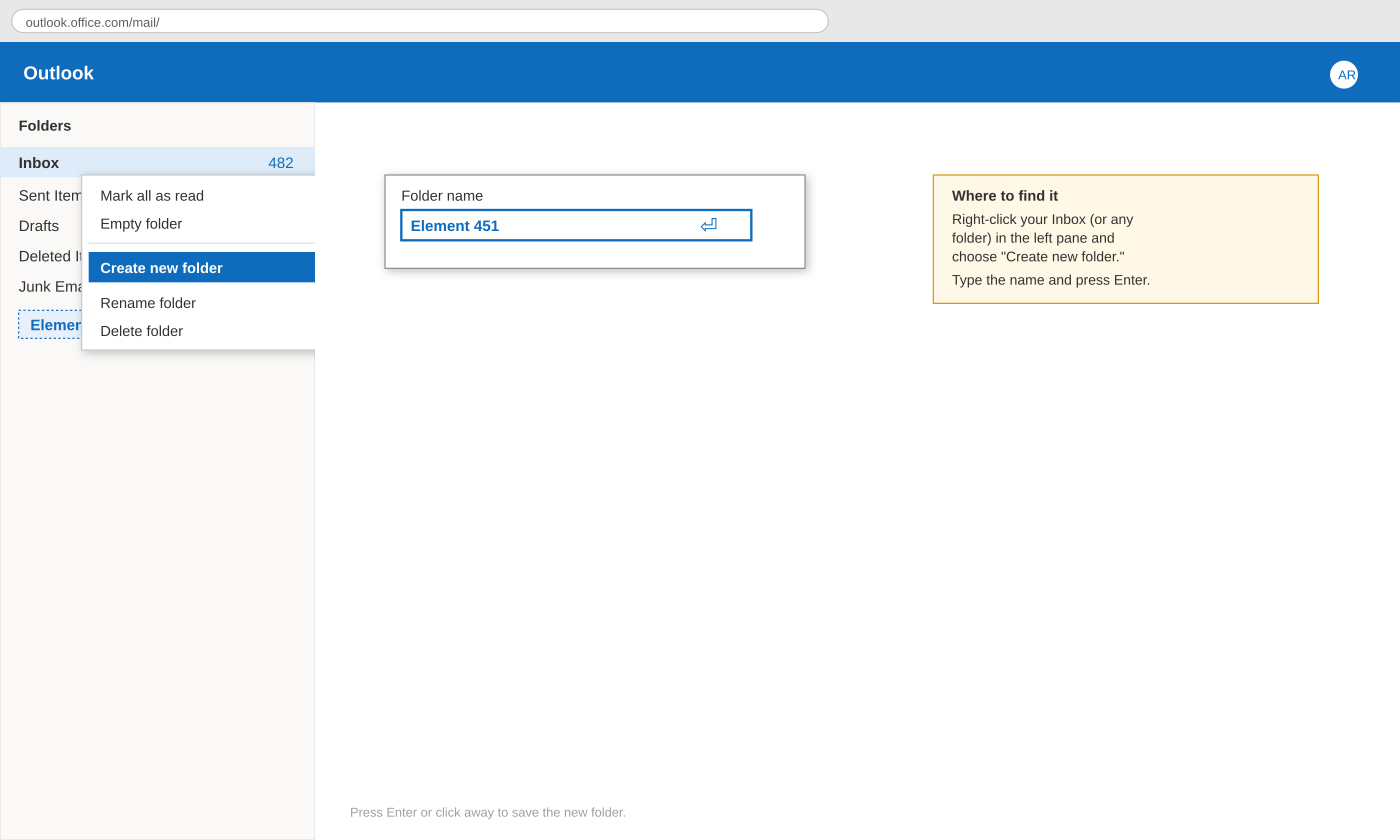
Figure 4. Right-click Inbox → Create new folder → type “Element 451” → Enter.
Step 2: Open Rules in Settings
Click the gear icon (Settings) in the top-right corner, then select View all Outlook settings. In the Settings panel, choose Mail → Rules, then click + Add new rule.
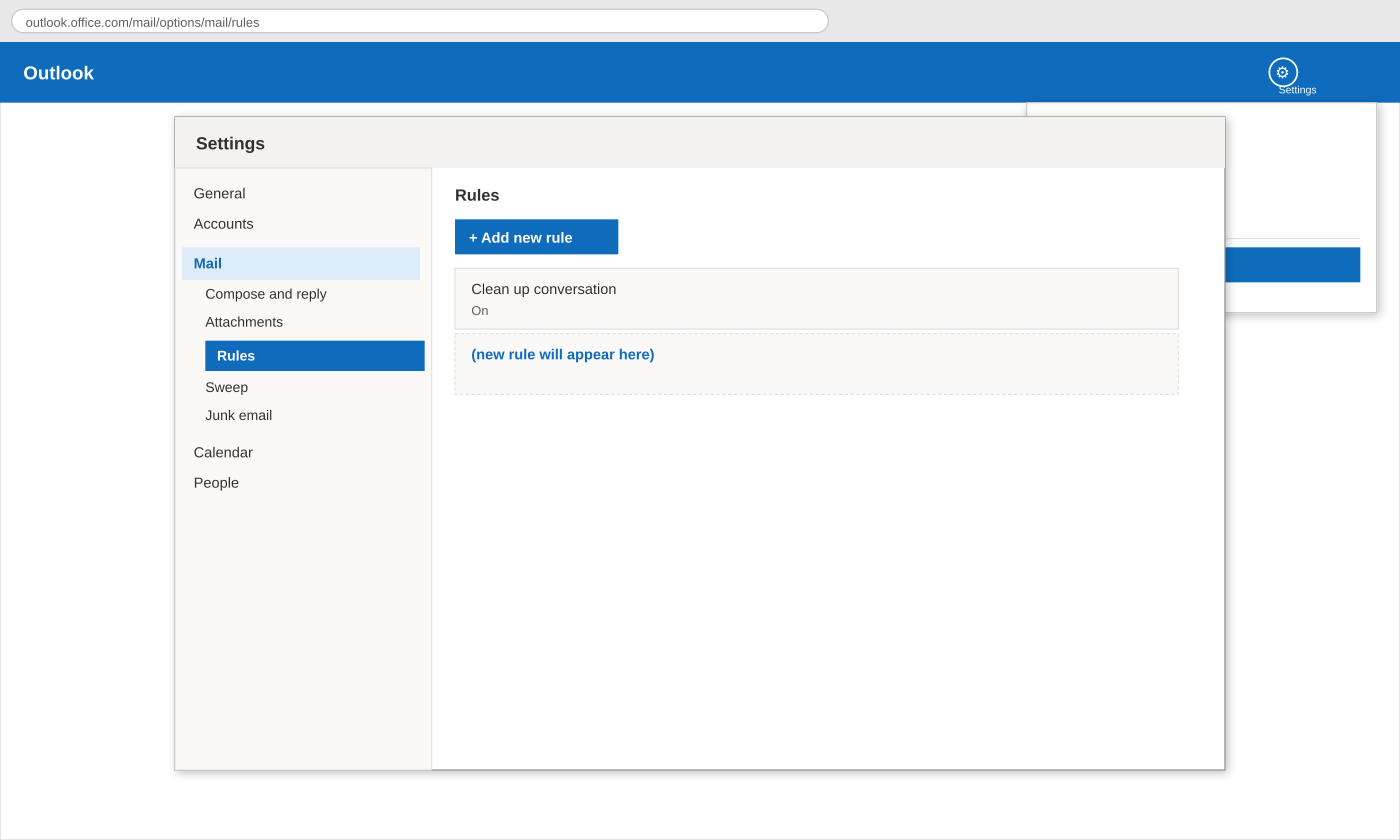
Figure 5. Settings (gear icon) → View all Outlook settings → Mail → Rules → Add new rule.
Step 3: Build the rule
Name the rule something clear, such as “Sort Element 451 Mail.” Under Add a condition, choose From, then Domain includes, and enter element451.com. Under Add an action, choose Move to and select your Element 451 folder. Optionally, click + Add another action to also choose Forward to and enter a shared mailbox or distribution list address.
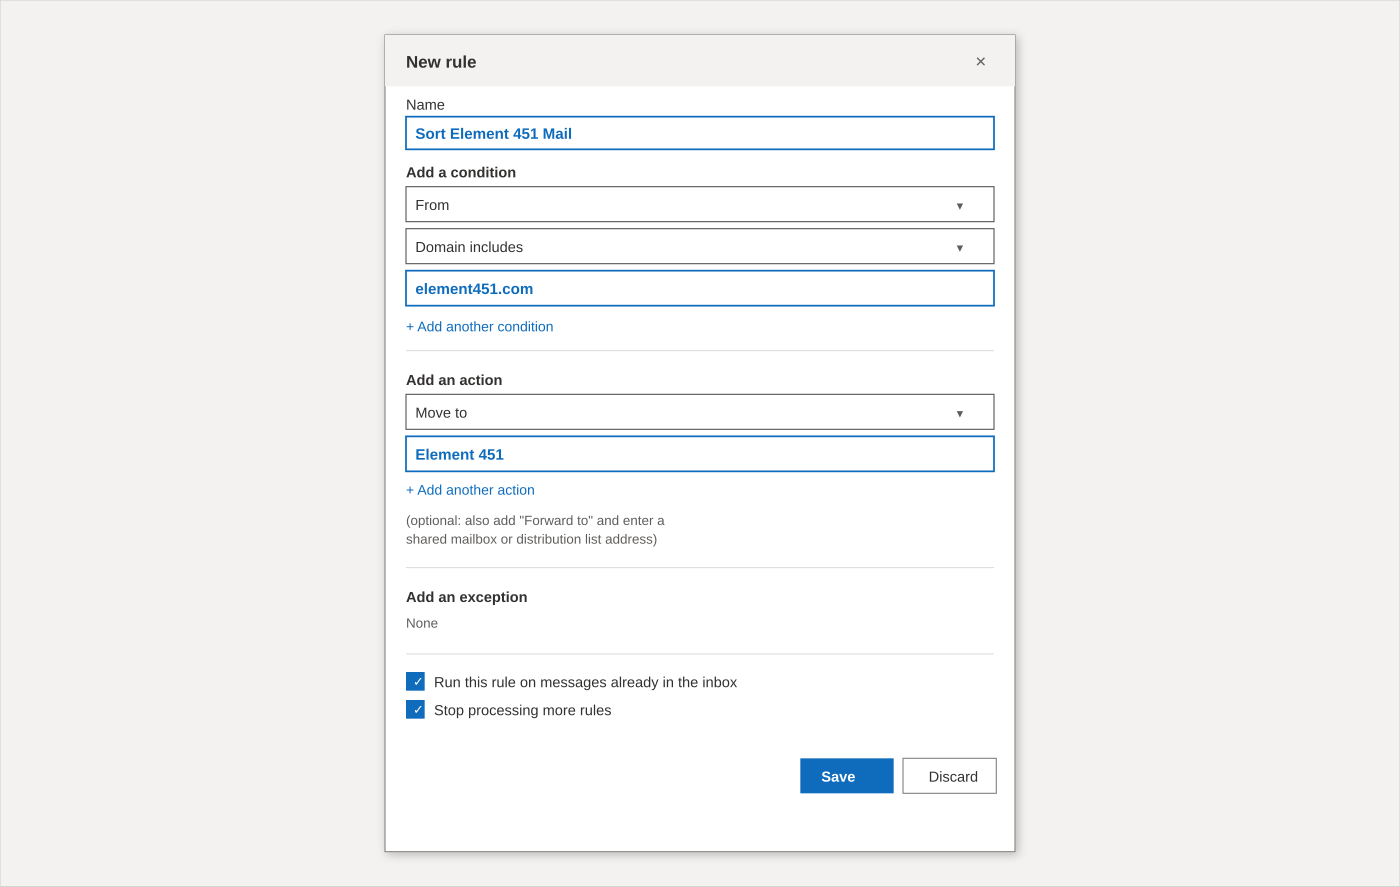
Figure 6. Set the condition (From → Domain includes) and action (Move to → Element 451), then Save.
Check “Run this rule on messages already in the inbox” to sort existing Element 451 mail immediately, and check “Stop processing more rules” so it is not caught by other rules. Click Save.
Result Existing and future Element 451 mail will be moved into your Element 451 folder automatically — the change applies across desktop, web, and mobile Outlook since it lives on the mailbox itself. |
Tips & Troubleshooting
- Not sure of the sending domain? Open a recent Element 451 email and check the full “From” address (click the sender's name to expand it) rather than relying on the friendly display name.
- Rule not catching everything? Element 451 may send from more than one subdomain or address (e.g., notifications@ and no-reply@). Add a second condition with “or” logic, or create two rules pointing to the same folder.
- Want a digest instead of instant forwarding? Skip the “Forward to” action and just use “Move to” — check the Element 451 folder on your own schedule instead of receiving a flood of forwarded copies.
- Rules only run on new mail by default. On desktop, right-click the rule in Manage Rules & Alerts and choose “Run Rules Now” to apply it to existing inbox messages. On the web, check the “Run this rule on messages already in the inbox” box when creating it.
- Desktop and web rules are stored on the mailbox (server-side), so a rule created in one will also run in the other and on mobile — you do not need to create it twice.
- Need help? Contact the LSUA Distance Learning team for assistance identifying the correct sender domain or setting this up for a shared/departmental mailbox.